Showy Milkweed Seedling Care: Growing Tips for Success
- August 27, 2025
- By Oliver Denver
Growing showy milkweed from seed can feel a bit tricky, I know. I’ve tried it myself, and sometimes it seems like they’re taking forever to pop up, or maybe they get a little too leggy for my liking. But with a few simple tips, I’ve found I can get these beautiful plants started strong. It’s rewarding to see them grow and know they’ll be a haven for monarch butterflies. Let me share what I’ve learned about caring for a showy milkweed seedling to help you have success, too.
Key Takeaways
- For best results with your showy milkweed seedling, start seeds indoors about 8-10 weeks before the last frost or sow directly outside after the danger of frost has passed. Cold stratification, mimicking winter conditions by chilling seeds, can significantly improve germination rates.
- Plant showy milkweed seeds about 1/4 inch deep in well-draining soil, and keep the soil consistently moist but not soggy, like a wrung-out sponge. Avoid letting pots dry out completely or having standing water.
- Provide plenty of light for your showy milkweed seedling; this means a sunny window or grow lights kept close. If seedlings start to stretch and get leggy, it’s a sign they need more light or perhaps some gentle air circulation.
- Transplant your showy milkweed seedling into the garden when it’s about 3 inches tall. Give them space, planting them 18-24 inches apart, in a spot that gets at least 6 hours of direct sunlight daily.
- Water young showy milkweed seedlings regularly to help them establish roots. Once established, they are quite drought-tolerant, but occasional deep watering during extreme dry spells is helpful.
How Fast Do Showy Milkweed Seedlings Develop?
When I first started growing showy milkweed, I was curious about how quickly these plants would get going. It feels like you wait forever for seeds to do anything, right? Well, with Asclepias speciosa, things move along at a decent pace, but it’s not like they’re instant giants.
Generally, you can expect to see seedlings pop up within about 10 to 20 days after sowing, assuming the conditions are just right – think warm temperatures and consistently moist soil. Once they do sprout, they’re not exactly racing to the finish line. It typically takes around 90 to 100 days from germination until the plant is considered mature. This period is when they focus on developing those showy flower heads and getting a solid root system established so they can handle whatever the weather throws at them.
Here’s a rough idea of what to expect
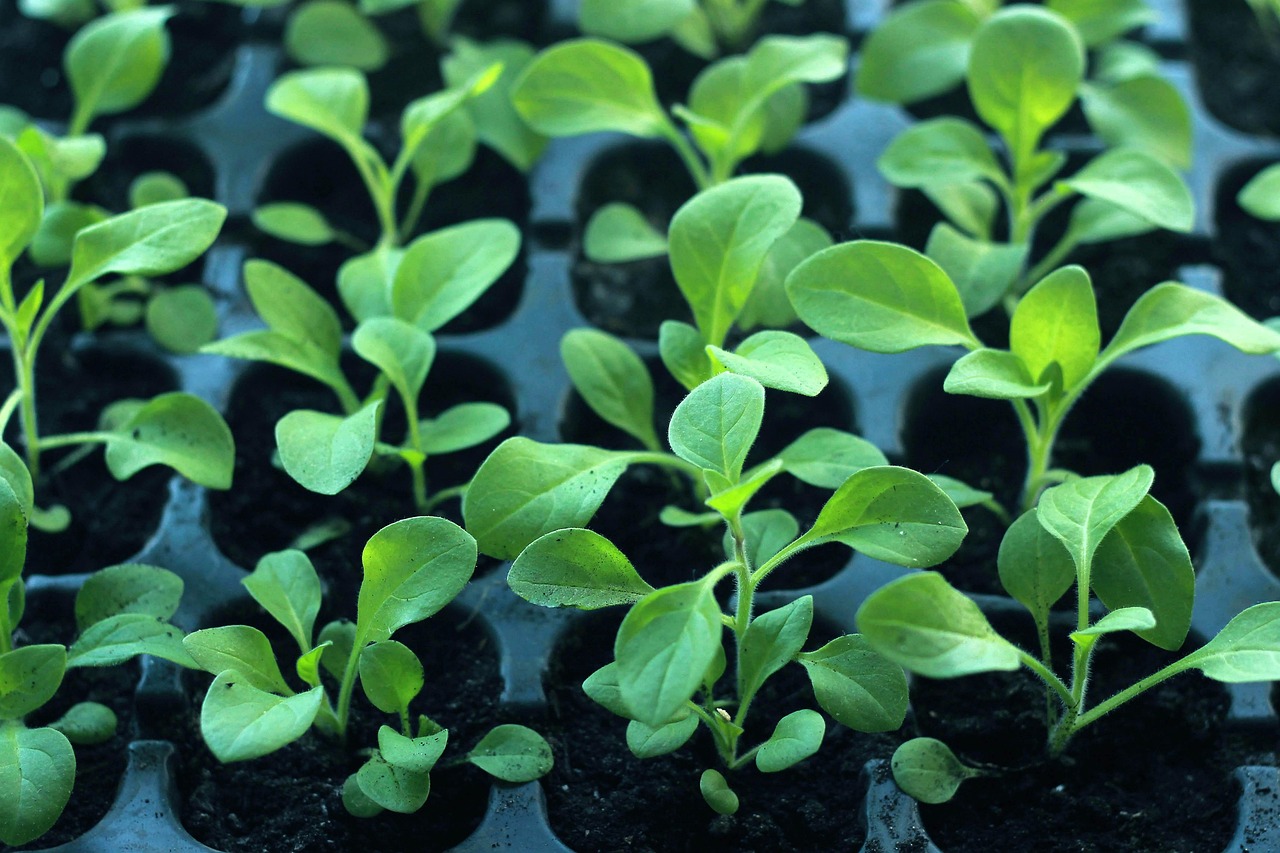
- Week 1-3: Tiny sprouts emerge. They’ll be delicate and might look a bit fragile. Keep the soil consistently moist but not waterlogged.
- Month 1-2: The seedlings will develop their first true leaves, which are usually a bit thicker and more oval-shaped than the initial seed leaves. They’ll start to look more like miniature versions of the mature plant.
- Month 2-3: Growth should become more noticeable. The plants will get taller and bushier, and if they’re happy with their spot, they might even start to show signs of preparing for their first bloom, though this usually happens in the second year.
It’s important to remember that these timelines are based on ideal conditions. Factors like light, water, soil quality, and even the specific genetics of the seed can influence how fast your showy milkweed develops. Patience is definitely a virtue when growing from seed.
So, while they aren’t the fastest growers in the plant world, showy milkweed seedlings do progress steadily. Just give them the right environment, and they’ll reward you with their unique beauty and vital support for pollinators.
Choosing the Ideal Light Conditions for Showy Milkweed Seedlings
When I’m starting showy milkweed (Asclepias speciosa) from seed, I always pay close attention to the light conditions. These plants do best with plenty of sunshine. Think of it like this: the more light they get, the happier and stronger they’ll be. Showy milkweed seedlings need at least six hours of direct sunlight every single day to thrive. If you’re starting them indoors, a sunny windowsill is good, but grow lights are even better. They need that intense light to develop sturdy stems and healthy leaves, not those weak, spindly ones that can happen if they don’t get enough.
When you’re picking a spot in the garden for them, whether you’re sowing seeds directly or transplanting seedlings, look for an open area. You don’t want any big trees or buildings casting shadows over them for most of the day. Even a little bit of shade can make a difference in how well they grow and how many flowers they produce later on. It’s all about giving them that full sun exposure to encourage strong growth and plenty of blooms, which is exactly what monarch butterflies are looking for.
The goal is to mimic the conditions they’d find in their natural habitat, which is typically open, sunny fields. This means avoiding shady spots and ensuring they get that direct sun for the majority of the day.
If you’re starting seeds indoors, here’s a quick rundown of what I do
- Use seedling trays or small pots filled with a light, well-draining potting mix.
- Sow seeds about 1/4 inch deep and keep the soil consistently moist.
- Place them under grow lights or in a very bright, sunny window.
- Aim for a consistent temperature, around 70-75°F (21-24°C) during the day.
Getting the light right from the very beginning sets them up for success. It’s one of those simple things that makes a big difference in the long run, helping them grow into robust plants that can support monarch butterflies. For more on starting seeds, you can check out how to grow common purslane from seeds.
Best Soil and Drainage for Healthy Seedling Growth
When I first started growing Showy Milkweed, I focused on getting the seeds to sprout, but I quickly learned that the soil and drainage are just as important for healthy seedlings. Showy Milkweed, or Asclepias speciosa, isn’t too picky, but it does have some preferences that will help your little plants get a strong start.
The most important thing is good drainage. If the soil stays too wet, the roots can rot, and that’s a quick way to lose a seedling. I learned this the hard way when a few of my first batches just seemed to give up. They need soil that lets water flow through easily. Think of it like this: you want the soil to be damp, like a wrung-out sponge, not soggy and waterlogged.
For the best results, I aim for a soil mix that is light and airy. A good starting point is a standard potting mix, but I often add some perlite or coarse sand to it. This helps improve the drainage. If I’m planting directly into a garden bed, I’ll amend the soil with compost to add nutrients and improve its structure, making sure it doesn’t hold too much water.
Here’s a general idea of what works well for me
- Potting Mix: Use a good-quality, light potting mix.
- Amendments: Mix in about 20-30% perlite or coarse sand for better drainage.
- Compost: If using garden soil, mix in a good amount of compost for nutrients and structure.
It’s also helpful to remember that as seedlings grow, their needs can change slightly. While they need consistent moisture when very young, established plants are more drought-tolerant. Getting the soil right from the start, however, sets them up for success. I found that using containers with drainage holes is non-negotiable; it’s the easiest way to prevent water from sitting at the bottom. If you’re planting directly into the ground, just make sure the area doesn’t tend to collect water after a rain.
I’ve noticed that seedlings grown in soil that drains well seem to develop stronger root systems faster. This makes them more resilient as they get bigger and eventually need to be transplanted. It pays off to get this part right early on.
Cold Stratification
When I first started growing showy milkweed, I learned quickly that just tossing the seeds into the soil wasn’t going to cut it. These little guys have a bit of a trick up their sleeve to make sure they don’t sprout too early and get zapped by a late frost. It’s called cold stratification, and it basically mimics winter.
Think about it: in nature, milkweed seeds fall late in the season. They sit through the cold, wet winter, and then when spring finally warms things up, they decide it’s time to grow. This cold period is what tells the seed, ‘Okay, it’s safe to start now.’ For us gardeners, especially if we’re starting seeds indoors or live in a place without harsh winters, we need to give them that cold treatment ourselves.
Without this cold exposure, your showy milkweed seeds are likely to just sit there, doing nothing. It’s an important step if you want to see those little green shoots pop up.
Here’s how I usually do it
- Get your seeds ready: I take my showy milkweed seeds and put them in a small baggie with a damp paper towel. Some people use a bit of damp sand or peat moss, which also works. The key is that the seeds need to be moist, but not soaking wet.
- Chill them out: I pop that baggie into the refrigerator. I usually put it in a spot where it won’t get bumped around too much, like in a crisper drawer. The temperature needs to be around 40°F (4°C).
- Wait it out: I leave them in there for at least 3 to 6 weeks. Longer is often better, up to a couple of months. I make sure to label the baggie with the date, so I know how long they’ve been chilling.
After they’ve had their cold spa treatment, I plant them as usual. It does make a difference in how many seeds actually decide to sprout. It feels like a bit of extra work, but it’s worth it to give these important plants the best start.
Some folks skip this step and sow seeds directly outdoors in the fall. The idea is that nature will do the stratification for them over the winter. This can work well, especially in areas with reliable cold winters, but I prefer to have a bit more control by doing it myself indoors before the growing season even starts.
When and How to Sow Showy Milkweed Seeds for a Strong Start
Deciding when and how to sow your showy milkweed seeds is a big deal if you want a strong start for these important plants. I’ve found that timing is everything, and there are a couple of ways to go about it.
For those of us in cooler climates or who just want to get a jump on the season, starting seeds indoors is a good option. I usually aim to do this about 8 to 10 weeks before the last expected frost. You’ll want to fill small pots or seed trays with a light, well-draining potting mix. Then, I scatter about 3-4 seeds per pot and cover them with roughly 1/4 inch of soil. Keeping the soil consistently moist – not soggy, though, that’s a quick way to invite trouble – and providing plenty of light and warmth is key. A sunny windowsill or grow lights work well. Germination typically happens within 10 to 20 days if things are just right.
Alternatively, you can sow seeds directly outdoors. The best time for this is usually in the fall, after the first frost but before the ground freezes solid. This allows the seeds to go through a natural cold stratification period over winter, which helps boost germination rates when spring arrives. If you miss the fall window, you can also direct sow in early spring, as soon as the soil can be worked, but be aware that germination might be a bit slower without that initial cold treatment. When sowing directly, I like to scatter the seeds and then lightly cover them with about 1/4 inch of soil. It’s important to keep the area moist until the seedlings are established.
Getting the sowing depth right, around 1/4 inch, is important for both indoor and outdoor sowing.
Here’s a quick rundown of what I’ve learned
- Indoor Sowing: Start 8-10 weeks before the last frost. Use well-draining soil, keep moist and warm, and provide ample light.
- Outdoor Sowing (Fall): Sow after the first frost but before the ground freezes. This allows for natural cold stratification.
- Outdoor Sowing (Spring): Sow as soon as the soil is workable. Germination may be slower without prior cold treatment.
- Sowing Depth: Aim for about 1/4 inch deep for both methods.
- Spacing: Once seedlings are ready to transplant or when direct sowing, give them about 18-24 inches of space.
I’ve noticed that showy milkweed seeds can be a bit finicky, and giving them that cold, moist period before planting seems to make a difference in how many actually sprout. It mimics what happens in nature, and the plants seem to appreciate it.
Remember, showy milkweed is a host plant for monarch caterpillars, so getting these seeds started right is a great way to support those beautiful butterflies.
Transplanting Seedlings
Once my Showy Milkweed seedlings have developed a few sets of true leaves and are a few inches tall, it’s time to think about moving them to their permanent home. This is a big step for them, and doing it right makes all the difference. I usually wait until after the last frost has passed and the soil has warmed up a bit. It’s also a good idea to get them used to the outdoors gradually before the big move.
I call this ‘hardening off.’ For about a week to ten days, I’ll put the seedlings outside in a sheltered spot for a few hours each day. I start them in the shade and slowly increase their exposure to direct sunlight. I keep an eye on them to make sure they aren’t wilting or looking stressed. This helps prevent transplant shock.
When I’m ready to plant them, I make sure the new spot gets plenty of sun. For Showy Milkweed, I aim to space them about 12 to 24 inches apart. This gives them room to grow and helps with air circulation, which is good for preventing diseases.
Here’s a quick rundown of what I do
- Prepare the new spot: I loosen the soil and mix in some compost if it needs a boost.
- Dig the hole: It should be about as deep and wide as the seedling’s current pot.
- Gently remove the seedling: I try not to disturb the roots too much. If it’s root-bound, I’ll gently loosen the roots at the bottom.
- Place the seedling in the hole: I make sure it’s at the same depth it was in its pot.
- Backfill the hole: I use the soil I removed, gently firming it around the base.
- Water thoroughly: This helps settle the soil and reduces air pockets.
After transplanting, I make sure to water them regularly until they are well-established. It’s important not to let the soil dry out completely, but I also avoid waterlogging the roots. Consistent moisture is key during this transition period.
Watering Young Showy Milkweed
When I first started growing showy milkweed, I was a bit unsure about how much water these plants needed. It turns out, they’re forgiving, but there’s a sweet spot, especially when they’re just starting. Keeping the soil consistently moist during the seedling stage is key to developing a strong root system. Once they get going, though, they become quite drought-tolerant.
For brand new seedlings, I aim to keep the soil damp, but not soggy. Think of it like a wrung-out sponge. I usually check the soil surface daily, and if it feels dry, I give them a gentle watering. This helps them establish themselves without getting waterlogged, which can lead to problems.
Here’s a general idea of how I approach watering
- Seedling Stage (First few weeks after germination): Water gently whenever the top layer of soil starts to feel dry. The goal is consistent moisture to encourage root growth.
- Young Plants (First year, after they’ve developed a few sets of leaves): I water a bit less frequently, allowing the soil to dry out slightly between waterings. This encourages deeper root development.
- Established Plants (Second year and beyond): These plants are tough! I only water during extended dry spells, usually giving them a deep soak every few weeks if there’s no rain. They don’t need much attention once they’re settled in.
It’s important to remember that overwatering can be just as harmful as underwatering, especially for young plants. Good drainage is your best friend here; it helps prevent the roots from sitting in water, which can cause them to rot.
As the plants mature, their needs change quite a bit. Established showy milkweed plants are quite resilient and can handle drier conditions. I find that occasional deep watering during periods of extreme drought is usually sufficient. This helps them maintain their health without needing constant attention.
Fertilizer Tips
When it comes to feeding your showy milkweed seedlings, I’ve found that less is often more, especially in the early stages. These plants are self-sufficient and don’t typically need a heavy hand with fertilizer right out of the gate. In fact, over-fertilizing can sometimes do more harm than good, leading to weak, leggy growth instead of the sturdy, bushy plants we’re aiming for.
For most seedlings, I generally don’t introduce any fertilizer until they’ve developed their first set of true leaves. Before that, they’re relying on the nutrients already present in the seed and the potting mix. Once they’ve got those initial leaves, a very diluted, balanced liquid fertilizer can be applied sparingly. I usually aim for about a quarter of the strength recommended on the product label. This provides a gentle boost without overwhelming the young plant.
Here’s a general guideline I follow
- Initial Stage (Seedling to first true leaves): No fertilizer needed. Focus on light, water, and proper soil.
- Early Growth (First true leaves to 2-3 sets of leaves): Apply a diluted liquid fertilizer (1/4 strength) once every 3-4 weeks, if at all. Observe the plant; if it looks healthy and green, you might not need it.
- Established Seedlings (4+ true leaves, ready for transplanting): You can continue with the diluted feeding schedule or switch to a slow-release granular fertilizer mixed into the soil according to package directions, but still be mindful not to overdo it.
It’s important to remember that the goal is to encourage healthy root development and sturdy stem growth, not rapid, unnatural expansion. Overfeeding can lead to a plant that looks good on top but has a weak root system, making it more susceptible to stress later on.
The best indicator of whether your seedlings need fertilizer is their overall appearance. Healthy, green leaves and steady, albeit slow, growth usually mean they have enough. If you notice pale or yellowing leaves, and the growth seems stunted despite adequate light and water, then a very mild feeding might be beneficial. Always err on the side of caution; it’s easier to add a little more fertilizer later than to fix a plant that’s been burned by too much.
I tend to avoid high-nitrogen fertilizers, as these can promote excessive leafy growth at the expense of root development. A balanced fertilizer, or one with a slightly higher phosphorus content, is usually a better choice for encouraging strong roots. Remember, the aim is to support the plant’s natural growth cycle, not to force it.
Preventing Leggy Growth in Showy Milkweed Seedlings
When I start milkweed seeds indoors, I sometimes notice the seedlings getting a bit stretched out and spindly. This is what we call “leggy growth,” and it happens when the little plants are reaching for more light. To prevent this, the most important thing is to make sure your seedlings get enough light. If you’re using grow lights, try to keep them close to the seedlings, maybe just a few inches above them. Adjusting the light height as the plants grow is key. Some people also find that a gentle, oscillating fan can help strengthen the stems by mimicking a light breeze. If the weather is warm enough, moving the seedlings outside to a bright spot can also be a great solution. It helps them develop sturdy stems and leaves.
Managing Spread
Showy milkweed, or Asclepias speciosa, is a plant that likes to spread. It does this in two main ways: through its underground root system, called rhizomes, and by scattering its seeds. If you’re not careful, you could end up with a lot more milkweed than you intended.
I’ve found that the best way to manage its spread is to be proactive from the start.
When it comes to rhizomes, these underground runners can take over a garden space. They tend to get going strong after a few years, usually around year three or four, especially if the plant is happy and healthy. If you’re worried about it spreading too much, consider planting your showy milkweed in containers or raised beds. This gives you a physical barrier to keep those rhizomes in check. It’s much easier to manage them this way than to try and dig them out later.
As for the seeds, milkweed pods split open and release fluffy seeds that can travel quite a distance on the wind. To control this self-seeding, I make it a habit to deadhead the flowers before they go to seed. This means snipping off the spent flower heads. It’s a simple step, but it makes a big difference in preventing unwanted seedlings from popping up all over the place.
It’s important to remember that while milkweed is great for monarchs, it can also become quite dominant in a garden if not managed. Thinking ahead about how you want it to spread, or not spread, will save you a lot of work down the line.
Pest & Disease Management During the Seedling Stage
When I’m growing showy milkweed from seed, I always keep an eye out for any unwelcome visitors or signs of trouble. It’s common for tiny pests like aphids to show up, usually clustering on the new growth or the undersides of leaves. They can weaken a young plant if left unchecked. Spider mites are another possibility, especially if the air is dry. You might see fine webbing or stippling on the leaves. Milkweed bugs can also appear, though they’re generally less of a concern for seedlings.
For aphids and spider mites, my first line of defense is usually a strong spray of water from the hose. This can knock them off the plants. If that doesn’t do the trick, or if the infestation is more serious, I’ll turn to insecticidal soap or neem oil. I make sure to spray in the early morning or late evening to avoid harming any beneficial insects, like ladybugs, that might be around. It’s important to remember that these plants are food for monarch caterpillars, so I try to be as gentle as possible.
Diseases are less common in very young seedlings, but powdery mildew can sometimes be an issue if the plants are too crowded and don’t have good air circulation. You’ll see a white, powdery coating on the leaves. To prevent this, I make sure my seedlings aren’t packed too tightly together and that they get plenty of light. If I do spot it, I’ll remove affected leaves and improve airflow. Sometimes, a milkweed-safe fungicide can help, but I try to avoid chemicals if I can.
Here’s a quick rundown of what I look for
- Aphids: Small, pear-shaped insects, often green, black, or yellow, found on new growth.
- Spider Mites: Tiny, almost invisible, but you might see fine webbing and yellowing or stippling on leaves.
- Powdery Mildew: A white, dusty coating on leaves and stems.
It’s always better to prevent problems than to try and fix them later. Good airflow, proper watering (not too much, not too little), and keeping an eye on your plants from the start make a big difference in keeping them healthy and strong.
If I notice milkweed bugs, which are black and red, I usually just pick them off by hand if there aren’t too many. They don’t typically cause significant damage to young plants, but I don’t want them getting out of control.
Pruning and Seasonal Maintenance for Long-Term Success
Once your showy milkweed seedlings have established themselves, a bit of seasonal upkeep goes a long way in keeping them healthy and vigorous for years to come. I find that paying attention to what the plant needs as the seasons change makes a difference.
In the fall, after the monarch butterflies have finished their migration and the plant has gone dormant, I usually cut back the dead stalks. This helps prevent any potential disease or pests from overwintering on the plant. It also makes the garden look tidier, which I appreciate. If I want to control how much the plant spreads through self-seeding, I’ll deadhead the flowers before they go to seed. It’s a simple step, but it helps manage where new plants pop up.
As winter approaches, I often add a layer of mulch around the base of the plants. This isn’t strictly necessary for showy milkweed in milder climates, but it does offer a bit of protection for the roots during colder spells and helps keep the soil from drying out too much. I make sure not to pile the mulch right up against the stems, though, as that can sometimes lead to rot.
Spring is when I get to see the results of my fall and winter care. New growth should start to emerge. If the plants have gotten a bit too crowded over the years, or if I want to propagate more plants, I might divide the clumps in early spring. This usually involves digging up the plant and carefully separating the root ball into smaller sections, making sure each section has some healthy roots and a growing point. It invigorates the plant and gives it more space to thrive.
Throughout the year, the main goal is to support the plant’s natural cycle and provide a healthy environment for pollinators. It’s less about aggressive intervention and more about gentle guidance.
Troubleshooting Common Seedling Challenges & Growth Tips
Sometimes, even with the best intentions, our little showy milkweed seedlings can run into a few snags. Don’t worry, it happens to the best of us! One common issue I’ve noticed is when seedlings get “leggy.” This usually means they’re stretching for more light. If you’re starting them indoors, try moving your light source closer, or maybe even give them a gentle breeze from a small fan to help them build stronger stems. If the weather is cooperating, getting them outside into a bright spot can also do wonders.
Another thing to watch out for is watering. Milkweed seeds and young seedlings are a bit particular – they like it just right, not too wet and not too dry. The soil should feel like a damp sponge. If you’re seeing standing water, that’s too much. If the soil is crumbly and dry, it’s not enough. A good trick I use is to place the pots in a shallow tray with about half an inch of water. The soil will soak up what it needs from the bottom. Just remember to remove any extra water after a couple of hours so the roots don’t sit in soggy conditions.
Germination can also be a slow process. Milkweed seeds can take their time deciding to sprout, sometimes 10 days, but often longer, even up to a month or more if conditions aren’t perfect. Patience is key here! Just keep providing consistent moisture and light. If you’re worried about transplanting, using biodegradable pots is a great idea. You can plant the whole pot, which helps protect those delicate roots. Just snip the bottom off the pot before planting to give the roots a clear path to grow.
It’s important to remember that milkweed, especially when young, doesn’t appreciate a lot of competition. When you’re ready to move them to a bigger pot or into the garden, give them some space. Clearing away any debris around the base of the seedling also helps the soil stay warm, which they seem to like.
Here are a few more things to keep in mind
- Slow Germination: Don’t get discouraged if seeds take a while to sprout. Consistent moisture and light are key. It can take anywhere from 10 days to over a month.
- Leggy Seedlings: This means they need more light. Move your light source closer or provide more direct sunlight.
- Watering Woes: Aim for soil that feels like a wrung-out sponge. Avoid soggy conditions or completely dry soil.
- Transplanting: Consider biodegradable pots to protect the roots. Planting the entire pot can minimize root disturbance.
Are your young plants having a tough time? Don’t worry, many new gardeners face similar issues. We’ve got simple tips to help your seedlings thrive. Learn how to fix common problems and give your plants the best start. Visit our website for more expert advice and to discover how we can help your garden grow!
Frequently Asked Questions
How can I stop my showy milkweed seedlings from getting leggy?
I’ve noticed that showy milkweed seedlings can get a bit tall and wobbly, which we call ‘leggy.’ This usually happens when they’re reaching for more light. To prevent this, I make sure my grow lights are quite close to the seedlings. Sometimes, a gentle fan blowing on them can help make their stems stronger. If the weather is nice, moving them outside can also help them grow sturdy.
What’s the best way to plant showy milkweed seeds indoors?
When I’m starting seeds indoors, I fill my pots with potting soil and plant about 3 to 4 seeds in each small container. I cover them with a little bit of soil, no more than about a quarter of an inch deep. It’s important not to bury them too deeply, as they need some light to start growing. I keep the soil moist, but not soggy, like a well-wrung-out sponge.
How long does it usually take for showy milkweed seeds to sprout?
I’ve found that showy milkweed seeds can take their time to sprout. If the conditions are just right – meaning the soil is moist, the temperature is warm, and there’s enough light – they might pop up in about 10 days. However, if the conditions aren’t perfect, it could take a month or even longer. I try not to get discouraged if they don’t sprout right away.
What is the best way to water delicate milkweed seedlings?
I make sure to water my young milkweed plants gently. One method I use is placing the pots in a shallow tray with about half an inch of water. The soil absorbs the water it needs. I remove any extra water after a couple of hours. Another way I water them is by using a spray bottle, which is very gentle.
When is the right time to transplant milkweed seedlings into the garden?
I usually transplant my showy milkweed seedlings into the garden when they are no taller than 3 inches. I also make sure to pick a spot that gets plenty of sun, at least 4 to 8 hours a day. It’s important to give them some space, about 18 to 24 inches apart, so they don’t have to compete with other plants for resources.
Why is showy milkweed so important for monarch butterflies?
Showy milkweed is important for monarch butterflies because it’s the only plant their caterpillars eat. The plants give the caterpillars the food they need to grow. Adult monarchs also use milkweed as a place to get nectar. So, by growing milkweed, I’m helping these beautiful butterflies survive.
How does showy milkweed spread, and how can I manage it?
I’ve learned that showy milkweed spreads through underground roots called rhizomes. If I want to keep it from spreading too much, I sometimes plant it in raised garden beds or containers. It usually doesn’t start spreading a lot until its third or fourth year, but it’s good to be aware of it.
How can I get more showy milkweed seeds to sprout successfully?
To get a good number of seeds to sprout, I make sure to give them cold treatment, called stratification, before planting. This means putting them in the fridge for a while to mimic winter. I also sometimes soak the seeds to help soften their outer coat, which can help them germinate better when I plant them.